Threat Selector
Introduction
The Threat Selector lets you convert threat assessments into JSON files for use within the Designer and Processor. In order to use it, you will need to have a list of the threat sources and actors that includes an assessment of their capability and motivation. There are two different styles of threat assessment, which use different terms.
Capability covers the threat's ability to carry out the attack. It takes into account factors such as their access to resources (people, equipment, and funding) and knowledge (of technologies, the target, and vulnerabilities).
Motivation considers how determined the attacker is to perform the attack. It looks at factors such as any reward or benefit that the attacker will get if successful, and the chances of them being caught and the level of punishment that they would receive.
Entering a threat assessment
The Threat Selector is found under the Tools menu on the black menu bar. It has a number of standard threat sources/actors listed on it. The following form will appear:

In order to add a threat, click on the appropriate row. The checkbox will be ticked, and input fields will appear in the Capability and Motivation columns.

Use the drop-downs in the Capability and Motivation columns to choose the values for these two fields. When both are completed, an assessment of the threat level will appear in the last column. This is created using the threat matrix.

The name of a threat can be changed by clicking on the pencil icon to the right of the name. Threat names can have up to 50 words. Once you have changed the name, press Enter or click out of the edit field. To cancel a change, press Escape.

A new threat that is a sub-category of an existing threat can be created by clicking on the button to the left of the threat ID. This will create a new threat row beneath, with the same ID suffixed by a letter. The name will be in 'edit mode', allowing you to immediately set the correct name.

Adding custom threats
You can add your own threats by clicking on the button. This will add a new row at the bottom of the table. New threats all have an ID consisting of T followed by a number. The checkbox will be automatically ticked, and you will need to enter a name for the threat. The name can be descriptive, and you can use up to 50 words.

If you change your mind about a threat, and do not want to include it in your assessment, simply untick the checkbox in the relevant row. This will remove the selectors and assessment level from the right-hand columns. Your values will not be lost though, so if you untick a row by accident or change your mind, just re-tick the box and the data will be restored.
You can edit the name of any of the threats, including the pre-defined threats, by clicking on the icon to the right of the threat name. Once amended, you can leave the name field and it will be used when you create the threat file.
Saving your assessment
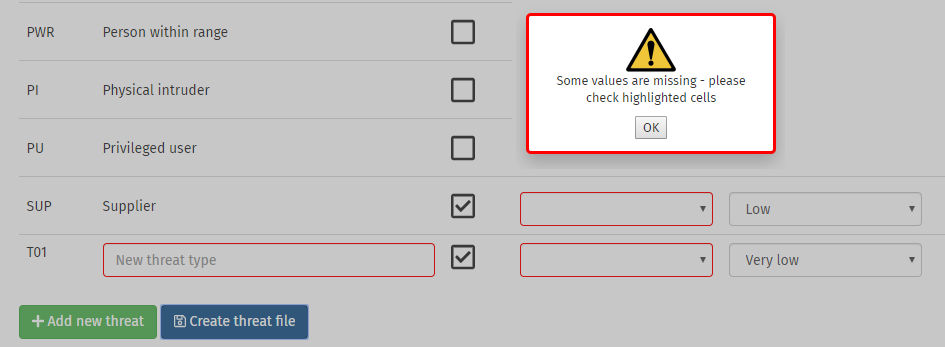
When your assessment is complete, click on the button. A JSON file containing your assessment will automatically be downloaded if all of the rows are correctly completed. If any selected rows have missing fields, these will be highlighted with a red border and an error message will appear. Only rows that have been ticked will be included in the saved file.

You will need to either complete the highlighted fields, or untick these rows.
Editing an existing threat assessment
If you already have a threat assessment file, it can be loaded into the Threat Selector by clicking on the button. This will import the values from the file into the threat selection form. You can then edit these as described above.