The Countermeasure Tab
The Countermeasure Tab can be found beneath the RiskTree in the Designer view. There are two more tabs inside the countermeasure tab which are Tree countermeasures and Countermeasure library.
Tree countermeasures tab
This tab contains a table that lists all of the countermeasures used in the current RiskTree.

The table has the following columns:
| Column | Contents |
|---|---|
| Ref | The reference number of the countermeasure, together with a coloured dot to show whether it is a residual or target countermeasure |
| Enabled | A checkbox allowing you to enable or disable the countermeasure. Disabled countermeasures will be ignored in risk calculations |
| Name | The name of the countermeasure. Hovering over the crosshairs will highlight the countermeasure on the RiskTree; clicking will centre the RiskTree on the countermeasure |
| Nodes affected | A list of the nodes that the countermeasure affects. End nodes (risks) are shown in bold, and if clicked will take you to the information about that risk on the risk tab. If there are more than four risks affected then they will be collapsed, and will show if the Click to view link is clicked. |
| Existing | Whether the countermeasure is currently existing (and thus contributes to residual risk), or is planned/hypothetical (and thus contributes to the target risk) |
| Confidence | The level of confidence in the countermeasure. NB: Only shown if confidence levels have been enabled for this RiskTree |
| Effect on | The risk affector values for this countermeasure. All six will be shown for attacks; only three will be shown for Hazards |
| Actions | A set of icons providing actions that can be performed on the countermeasure, as follows:
|
Options

The options button provides the following functions:
- Show countermeasures on RiskTree: tick to put the countermeasure circles onto the RiskTree diagram
- Show confidence colours: if confidence values have been enabled, tick to change the countermeasure circle colours to match the confidence levels (instead of showing whether they are residual or target countermeasures)
- Hide countermeasures on hidden nodes: tick to remove any countermeasures located on hidden nodes from the countermeasure table
- Clear all countermeasures: click this button to delete all countermeasures
- Save countermeasures: click to save the countermeasures on this RiskTree into a countermeasure library file
- Include in printed report: tick to include the countermeasure table in the printable report
Copying
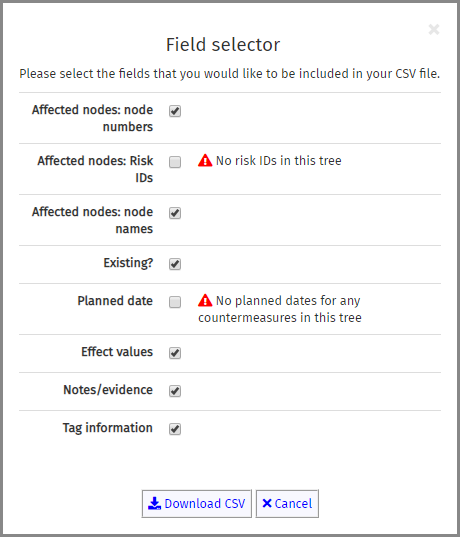
The blue copy button allows you to copy the countermeasure table onto either your computer's clipboard (functionality depends on browser and operating system), or to a CSV file. The CSV option will open a data chooser that allows you to select which values are included in the file.

If your RiskTree does not use Risk IDs, tags, or planned dates, these options will not be ticked and a warning message will appear alongside (as shown in the image above). You can override this setting, but the column will be empty in the CSV file. Click on the Download CSV button, and your file will be generated.
Countermeasure library tab
This tab contains a table for each countermeasure library that has been loaded into your RiskTree project. You can view all the countermeasures within each library and their values. You cannot edit the countermeasures directly in this tab, but you can navigate to the countermeasure manager tool using the red 'Create/edit a countermeasure library' button. To learn how to load countermeasure libraries and add these countermeasures to your tree nodes, please see the Using a countermeasure library page.
