Countermeasures
Introduction
Countermeasures are applied to risks in order to provide mitigation. They can be applied to any node in a RiskTree, and will affect that node and all of its children. Each countermeasure has the same set of assessment values as the node that it affects (six for attack nodes; three for Hazards, but the values are expressed as changes. Countermeasures are shown on the RiskTree as coloured circles along the bottom edge of their nodes. The circle will show the reference number of the countermeasure, and the colour will depend on the type of the countermeasure, which in turn will affect the type of risk calculation in which they are involved. The reference numbers start at 0 and will increment with each new countermeasure that you create. If you delete a countermeasure, its reference number will be reused for the next new countermeasure.
Countermeasures affect the node on which they reside, and all of that node's children. This helps to keep the number of countermeasures in use to a manageable number. For example, a node entitled 'Internal staff', beneath which all staff risks are placed, might have a countermeasure of 'Staff vetting' on it. This countermeasure will have an effect on all of the internal staff risks.
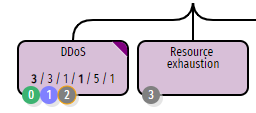
This diagram shows the various types. |
|
Your countermeasures are all shown in a table on the Countermeasure tab beneath the RiskTree.
You can alter the colours of the residual and target countermeasures, shown as green and blue above, through the Customize RiskTree page. If you have changed the colours then your RiskTree countermeasures will differ from those shown above.
Creating and editing countermeasures
To create a new countermeasure, open the node editor box by clicking the edit node button and then navigating to the countermeasures tab.
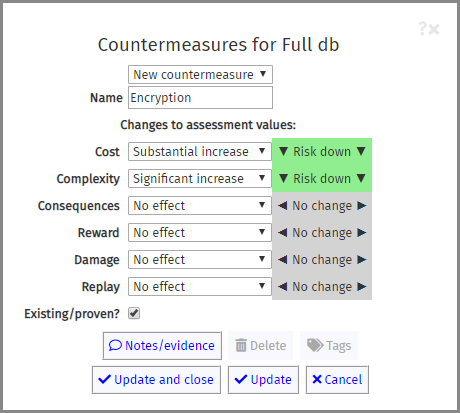
Enter the name of the countermeasure into the Countermeasure name field. Next, choose how this countermeasure will affect the risk assessment values using the plus and minus buttons. As you do so, the risk change indicators to the right will show whether the countermeasure is increasing or decreasing the risk.
A typical countermeasure will only need up to three risk affector values to be set. The others will remain at 'No effect'.
If the countermeasure exists and is proven, tick the Existing/proven? box. If it is hypothetical or planned, leave this unticked. If you are entering multiple countermeasures for this node, click on the Update button, which will create the countermeasure and clear the box ready for your next countermeasure.
To edit an existing countermeasure, you can edit it within the node editor shown above or by selecting from the countermeasure menu. If there are existing countermeasures attached to the node, the countermeausres will be shown in the scrollable bar along the top of the countermeasure tab. You can click on these countermeasures to load their values below and edit them.
Countermeasure types
There are two types of countermeasure: residual and target, as shown in the table above. They have slightly different fields to complete when they are created and edited.
Residual countermeasures – created by ticking the Existing/proven checkbox – will prompt for a confidence level if you have enabled these. The confidence can be set from 0% to 100%, in 25% increments.
Intrinsic countermeasures – created by leaving the Existing/proven checkbox unticked – will prompt for a planned date. This is entirely optional, but can be used if you are entering a countermeasure that is planned but not yet operational. This will enable RiskTree to create a Risk Forecast chart, showing how your risk level will change over time.
Copying and pasting
If you copy and paste a node, any countermeasures on that node will be pasted with it. The new countermeasures will have new reference numbers, and will therefore be separate to the original countermeasures from which they were copied.
|
|
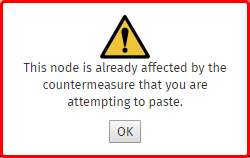 If you attempt to paste a countermeasure onto a node that is already affected by the same countermeasure, this error message will be shown. |
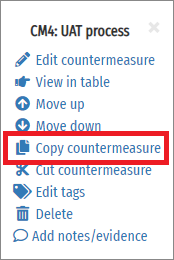
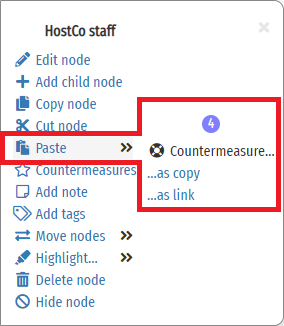
Countermeasures can also be copied individually, by selecting from the countermeasure menu, or by clicking on the Copy icon () on the Countermeasure Tab. To paste a copied countermeasure, select from the node menu of the node onto which you want to paste the countermeasure. You will have two options: as copy, and as link
creates a copy of the countermeasure on the selected node. This copy will have a new reference number, and
will be completely separate from the original countermeasure.
puts the same countermeasure onto the selected node. It will have the same reference number as the original, and
editing either copy will change both. Linked countermeasures can be used to place the same countermeasure on different parts of a tree where there is no common root node on which it would make sense to put a
single countermeasure. You will not be able to paste a countermeasure as either a copy or a link onto a node that the countermeasure already affects.
Deleting countermeasures
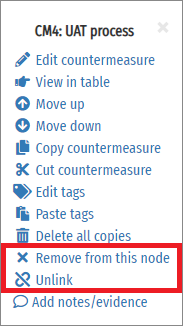
To delete a countermeasure from a node, open the countermeasure menu and select . Alternatively, find the countermeasure in the table on the countermeasure tab and select the Delete icon ().
Linking countermeasures
A linked countermeasure will have several copies with the same reference number, in a single RiskTree. The countermeasure will have one set of risk affector values, so changing these on once instance of the countermeasure will change them all all of the linked countermeasures. If you do not want this to happen, the you need to unlink the countermeasures. This is done by selecting from the countermeasure menu.
If you want to delete just a single instance of a linked countermeasure, select from the countermeasure menu.
Moving countermeasures
Countermeasures can be moved up and down a tree. Selecting will move the countermeasure onto its parent node. Selecting will move the countermeasure onto all immediate child nodes as a linked countermeasure.
Take care when moving countermeasures up and down a tree with linked countermeasures, as it is possible to end up with the countermeasure occurring twice in the same branch of the tree. This will cause it to be taken into account twice in the risk calculations, which is probably not desirable.