Creating RiskTree reports
Introduction
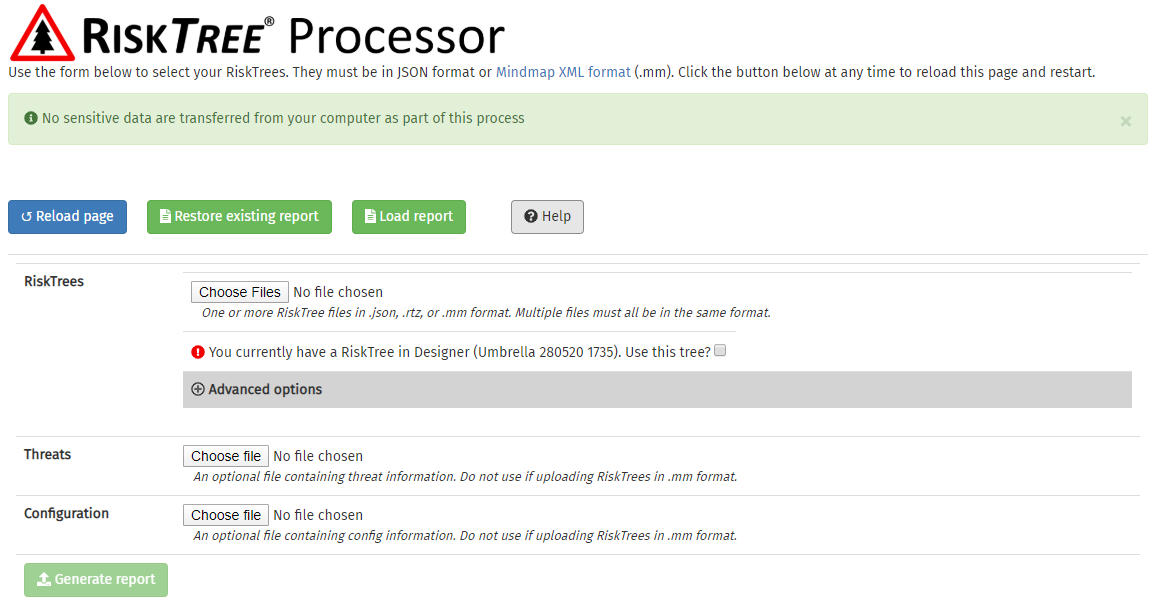
RiskTree reports are created using the Processor. This allows you to assess the risks of one or more RiskTrees in a single report. The Processor is found under the Prioritize and Report menu at the top of the screen. The information below is about creating a new report; other help pages provide information on loading existing reports and updating reports.

Specifying report options
In order to create a report, as a minimum you must specify the RiskTree files to be used. These are selected by clicking on the grey Choose Files button. You can select multiple files in the file chooser dialogue box than opens. Once you have chosen the files in this dialogue box, they will be listed in a box on the Processor screen, and the background of the RiskTrees section will change to green.

If you have previously been working on a RiskTree in the Designer, the Processor will detect this. It will tell you the name of the tree (from the project title), and give you the option to use this tree. You can generate the report from this tree alone, or include additional files as well by using the file chooser.
Advanced options
These allow you to configure your report in more detail. Click on the grey bar to view the options:

- Hidden risks are... : determines how any risks that have been hidden in the RiskTrees will be handled by the Processor:
- included in calculation and report – all risks, including those that are hidden, will be included in the risk report. This option is useful if you have been hiding sections of a RiskTree to make it easier to work with it on-screen, but all parts of the tree should be included in the risk assessment
- included in calculation, but hidden in report – every risk, including those that are hidden, will be used to perform the risk calculation. However, the hidden risks (and any countermeasures that are only found on hidden risks) will be omitted from the risk report. This lets you build a tree with different risk scenarios and by changing which are hidden, produce a set of risk assessments for the different scenarios
- omitted from calculation and report – any hidden risk will be removed from the data before calculation, so they will not affect the risk results not appear in the report. This is the equivalent to the risk calculation performed in the RiskTree Designer
- If countermeasures are present… : this lets you choose how countermeasures are handled, as follows:
- include enabled countermeasures – the default option, this uses all countermeasures that have the Enabled box ticked in the Countermeasures tab in the RiskTree Designer
- include all countermeasures – this will take all countermeasures into account in the calculation, whether they are enabled or not
- do not include countermeasures – this will exclude all countermeasures, and therefore perform an intrinsic risk assessment
- Assess … risks : this lets you set the level at which the risks will be assessed.
- Risk tolerance : sets a risk tolerance level against which each risk will be assessed. Each risk will be shown as inside or outside tolerance.
- Set any confidence levels to 100% in target calculation : if ticked (the default setting), this will increase the confidence for all existing countermeasures to 100% for the target risk calculation, on the assumption that your target should be to have full confidence in your countermeasures. This can result in target risks being lower than residual risks without having any target countermeasures (but where this is the case, a note will be shown).
- Link node names: risks can be identified by listing their path through the tree. The default is to list from the root node downwards, with double chevrons linking them (i.e., Root node » Intermediate node » Risk node). This option let you replace the chevrons by the link words that can be created for some or all of your links in the Designer. You can also reverse the order (i.e., bottom to top), or just show the risk node names on their own.
- Split tree at second level into separate trees: this lets you break one tree into a number of smaller trees as it is processed, with the root node of each new tree being one of the nodes immediately below the root node of the uploaded tree.
Threats
This lets you select a file containing information on different attacker type. The threat information file is created using the Threat Manager, accessible from the Tools menu.
Config
This lets you include a custom configuration file, which is required if you want to change the names or colours of the risk levels, or the number of risk levels to use. The configuration file is created using the Config Creator, accessible from the Tools menu. If you load a single RiskTree file that has been created using a custom configuration, this will be used for the risk calculation. If multiple RiskTrees are loaded then the default risk bands will be used; if a separate config file is loaded then this will be used for the risk band information.
Creating the report
Once you have set the parameters for your RiskTree report, click on the button. There will be a short delay whilst the data are processed and the report is generated; progress will be shown by a striped blue progress bar. When the report is complete, the report parameters will fade out and be replaced by the tabulated report. If you need to generate a new report without saving the existing report, click on the button at the top of the page.